
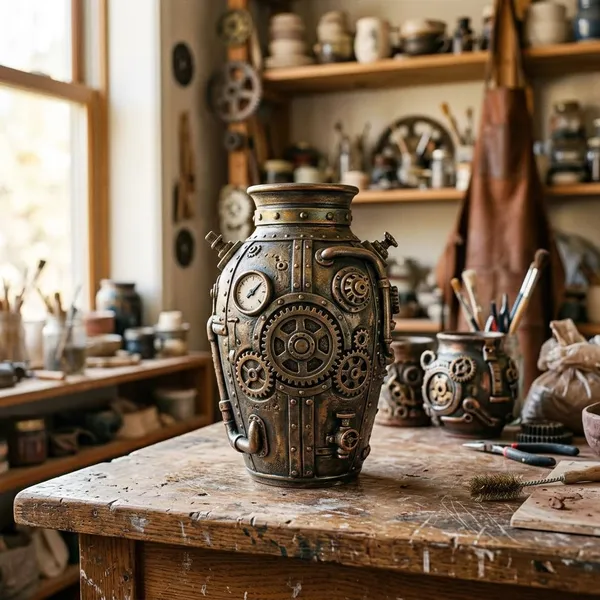
Steampunk pottery works best when it still behaves like good pottery first: comfortable to hold, stable on a shelf or table, and finished safely for its intended use. The steampunk part comes from the added illusion of old machinery—Victorian shapes, rivets, pipes, darkened seams, and metal-like glazes that make clay feel as if it came from a workshop or boiler room.
What makes pottery steampunk
A piece starts to feel steampunk when the form, details, and finish all point in the same direction. A plain mug with one gear stuck to the side can look like a novelty item. A rounded mug with a dark iron glaze, raised rivets, a pipe-like handle, and worn edges feels more intentional.
Victorian-inspired shapes
Victorian-inspired shapes give the style its older, more romantic base. Think rounded teapots, apothecary jars, formal cups, domed lids, narrow feet, and curved shoulders rather than sharp modern cylinders.
If you are making a piece, start with a silhouette that already feels slightly antique before adding mechanical details. If you are buying one, look for a base form that would still be attractive without the gears; that usually means the artist did not rely on surface decoration alone.
Gears, pipes, and rivets
Gears, pipes, and rivets are useful when they behave like part of the design. They work especially well around lids, seams, handles, spouts, collars, and panel edges, where mechanical details would naturally belong.
- Use fewer large details when the form is already dramatic.
- Add small rivets in repeated lines to suggest straps, plates, or repairs.
- Avoid covering every surface; clutter makes the piece harder to read.
Brass, copper, and iron tones
Color does much of the work in steampunk pottery. Brass-like surfaces often lean warm brown, amber, olive, and muted gold. Copper effects can include reddish brown with small green or turquoise patina notes. Iron-inspired finishes usually sit closer to charcoal, black, rust, and deep umber.
The finish should not look too even. Real aged metal darkens in recesses and gets brighter on handled edges, so a little variation usually looks more convincing than one flat "metallic" color.
Aged mechanical textures
Texture gives the pottery its sense of age. Carved seams, stamped dots, pitted areas, rough slip, impressed mesh, and scraped edges can make clay read as cast metal, worn plating, or repaired machine parts.
For functional pieces, texture needs restraint. A display jar can handle rougher surfaces and fragile projections, but a mug needs a smooth rim, a comfortable handle, and areas that are easy to clean.
Popular types of steampunk pottery
The best type depends on whether you want something to use every day or a piece that mostly sits on display. Daily-use pottery needs comfort and cleanability first. Display work can carry more fragile detail, sharper silhouettes, and heavier surface effects.
| Best choice if you want... | Look at these forms | Check before buying |
|---|---|---|
| Everyday use | Mugs, cups, simple jars | Smooth rim, stable base, safe interior glaze |
| A strong shelf piece | Teapots, pitchers, lidded boxes | Secure lid, balanced weight, clean joins |
| Maximum visual impact | Sculptures and display vessels | Craftsmanship, texture depth, believable finish |
Mugs and cups
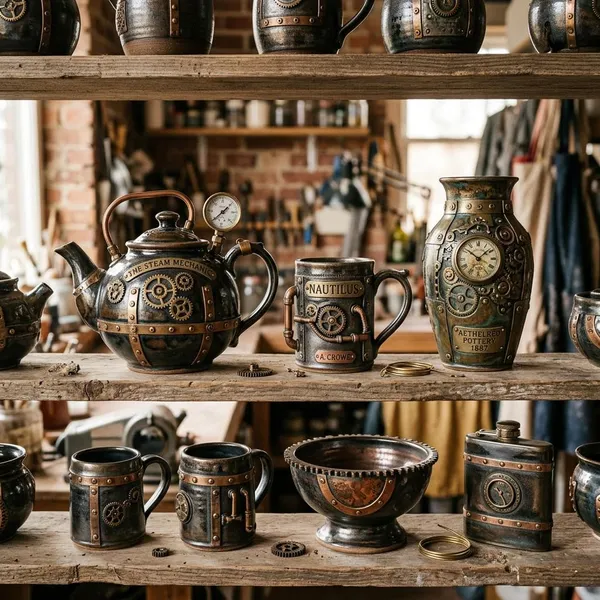
Mugs and cups are the easiest starting point for most collectors because they are useful, compact, and often less expensive than large sculptural pieces. A good steampunk mug might use a pipe-style handle, stamped rivets, dark seams, or a coppery glaze without making the cup awkward to drink from.
For regular coffee or tea use, put comfort ahead of drama. Thick decoration near the rim, sharp raised details where your fingers rest, or an unbalanced handle will become annoying quickly.
Teapots and pitchers
Teapots and pitchers naturally suit the style because they already have parts that resemble machinery: spouts, lids, handles, vents, and rounded bodies. A teapot can look like a small boiler or fictional steam device without losing its basic purpose.
The practical test is pouring. A dramatic spout that drips, a lid that slides when tilted, or a handle that feels unsafe can turn an impressive object into something you never use. For a display-only teapot, those issues matter less, but they should be clear before you buy.
Jars and lidded boxes
Jars and lidded boxes are a good middle ground: useful enough for tea bags, desk items, jewelry, or keepsakes, but still strong as display pieces. Lids give artists a natural place for valve-like knobs, hatch details, gauge shapes, or raised collars.
- For food storage: check that the inside is smooth and appropriately glazed.
- For desk or shelf use: exterior texture can be heavier and more theatrical.
- For frequent handling: avoid tiny fragile parts near the lid edge.
Sculptures and display pieces
Sculptural steampunk ceramics allow the most freedom. Artists can build mechanical animals, airship forms, robots, fantasy engines, skulls, or vessel-like machines without worrying about pouring, stacking, or dishwasher practicality.
How artists create steampunk ceramics
Most steampunk ceramics begin with ordinary pottery skills, then move into sculptural building and surface design. The strongest work is usually made in layers: first the vessel, then the mechanical structure, then texture, then the aged finish.
The main technical risk is attachment. Extra bands, gears, pipes, and handles add weight and create stress points as clay dries and shrinks. That is why a piece can look exciting in wet clay but fail later if the joins are rushed.
Wheel-throwing the base form
Wheel-throwing is often used for mugs, cups, jars, pitchers, and teapot bodies because it gives the piece even walls and balanced curves. Those basics matter more than they may seem; a heavy decorative surface looks better when the underlying form is steady and well proportioned.
Hand-building mechanical details
Hand-building is where the steampunk character really appears. Slabs can become straps and panels, coils can become pipes, and small clay pieces can become rivets, vents, bolts, knobs, or faux gauges.
Scale matters here. On a daily-use cup, smaller details are safer and easier to clean. On a sculpture, the artist can push the details further because the piece does not need to survive the same handling.
Carving and stamping textures
Carving and stamping are efficient ways to make a surface feel engineered. Repeated dots can become rivets, incised lines can suggest panels, and pressed mesh can create an industrial texture that catches glaze beautifully.
These marks also help the finish later. Oxides and darker glazes settle into low areas, while ridges catch highlights, creating the light-and-shadow contrast that makes ceramic surfaces look older and more metallic.
Joining parts securely
Secure joining is non-negotiable for steampunk pottery. Makers typically score both surfaces, add slip, press the parts together, and compress the seam so the attachment becomes part of the form rather than a weak decoration sitting on top.
- Match moisture levels so one part does not shrink faster than the other.
- Support heavier additions while the clay firms up.
- Dry slowly when the piece has thick and thin sections.
- Inspect stress points around handles, spouts, lids, and raised bands.
How to create an aged metal finish
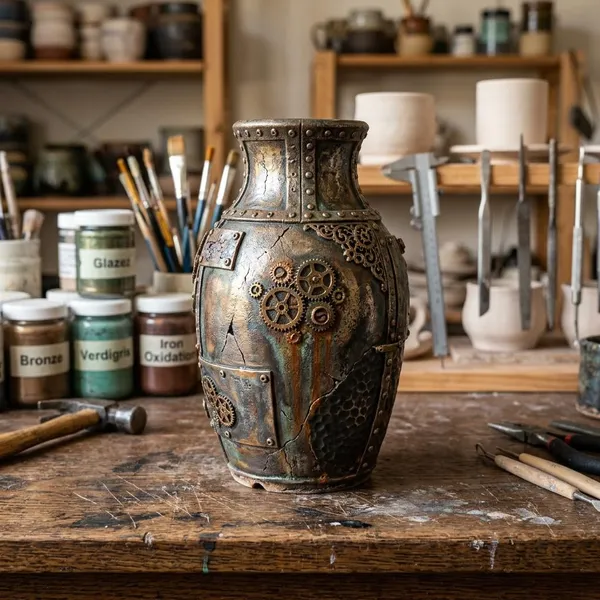
An aged metal finish depends on depth, not just a metallic-looking color. The most convincing surfaces usually have dark recesses, warm or cool midtones, and brighter worn edges where a real object might have been handled over time.
If you are experimenting as a maker, test finishes on small textured tiles before using them on a finished piece. Clay body, firing temperature, glaze thickness, and texture can all change the result, so a reliable test is better than guessing on a large teapot or sculpture.
Layer metallic-looking glazes
Layering glazes helps avoid a flat painted look. A dark base layer can create depth, while warmer brown, amber, olive, rust, or coppery tones build the metal impression over the top.
On textured work, glaze that breaks over edges and pools in recesses can do more than one perfect color ever will. That unevenness is often what makes the surface feel aged rather than simply decorated.
Add oxide washes
Oxide washes are commonly used to darken carved lines, stamped marks, and rough textures. The wash is brushed on and wiped back so the darker material stays mainly in low areas, creating the look of grime, soot, or oxidation.
For mugs, cups, and teapots meant for food or drink, stronger oxide effects are usually safer on the outside. Interiors, rims, and drinking surfaces should stay smooth, stable, and easy to clean.
Highlight raised details
Raised details often need a little brightness. Lightly brushing or sponging a lighter tone across rivets, edges, bands, and ridges can mimic the way old metal becomes polished where it is touched or rubbed.
- Highlight edges first so the form stays readable.
- Use less on functional ware to keep the piece refined.
- Go bolder on sculpture where theatrical contrast suits the object.
Build controlled wear and patina
Patina looks best when it follows logic. Green oxidation belongs near copper-like areas, darker grime makes sense in seams and under raised parts, and rust-colored spotting works better near iron-like surfaces than scattered randomly everywhere.
Conclusion
Steampunk pottery is most satisfying when it balances imagination with craft: a comfortable mug can still look like old machinery, and a display sculpture can still show disciplined construction. If you are buying, check use, joins, weight, and finish before falling for surface detail; if you are making, build the form first and let the gears, patina, and rivets earn their place.
FAQ
Can steampunk pottery be used for food and drinks?
Yes, but only when the maker has used an appropriate food-safe glaze on the surfaces that touch food or drink. Treat heavy exterior texture and metallic-looking effects as decorative unless the artist clearly states they are suitable for use.
Which clay works best for steampunk pottery?
Stoneware is usually the most practical choice because it is durable and handles textured forms well. Earthenware can work for decorative pieces, while porcelain is better for smoother, more refined designs than rugged mechanical effects.
How do ceramic artists create a metal look?
They combine texture, layered glaze, oxide in recesses, and lighter highlights on raised edges. The surface reads as metal because of contrast and wear patterns, not because the clay actually becomes metal.
Are handmade steampunk ceramics worth the price?
They can be worth it when the piece shows strong construction, original design, and a finish that took real surface work. For functional pieces, value also depends on whether the mug, jar, teapot, or pitcher is genuinely pleasant to use.
Can steampunk pottery be used for food and drinks?
Yes, but only when the maker has used an appropriate food-safe glaze on the surfaces that touch food or drink. Treat heavy exterior texture and metallic-looking effects as decorative unless the artist clearly states they are suitable for use.
Which clay works best for steampunk pottery?
Stoneware is usually the most practical choice because it is durable and handles textured forms well. Earthenware can work for decorative pieces, while porcelain is better for smoother, more refined designs than rugged mechanical effects.
How do ceramic artists create a metal look?
They combine texture, layered glaze, oxide in recesses, and lighter highlights on raised edges. The surface reads as metal because of contrast and wear patterns, not because the clay actually becomes metal.
Are handmade steampunk ceramics worth the price?
They can be worth it when the piece shows strong construction, original design, and a finish that took real surface work. For functional pieces, value also depends on whether the mug, jar, teapot, or pitcher is genuinely pleasant to use.