
For easy steampunk makeup for men, start with a rugged face rather than a perfect one: light base, smudged soot, stronger brows or beard shape, muted bronze, and one clear mechanical detail. That is usually enough for a costume, party, convention, or cosplay look without needing full special-effects makeup.
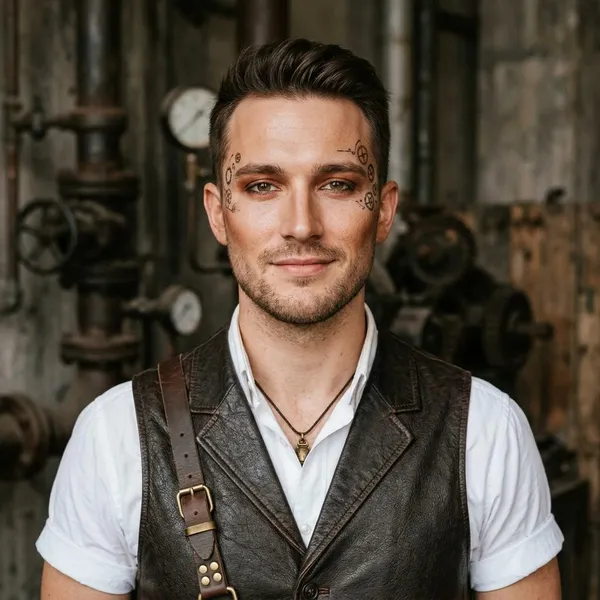
Best steampunk makeup looks for men
The easiest way to choose a look is to decide what kind of character you are playing. A clean inventor, a wind-worn pilot, a dirty mechanic, and a wasteland explorer should not have the same soot placement or the same amount of metallic detail.
Victorian gentleman inventor
A Victorian gentleman inventor should look neat, clever, and slightly eccentric. Keep the skin fairly clean, add soft contour under the cheekbones and jaw, then use a little antique gold or bronze near the temples or upper cheekbones.
Rugged airship pilot
An airship pilot works best with wind-worn shading and a goggle mark. Blend brown, charcoal, or gray around the eyes, temples, and sides of the nose, then soften the edges so it looks like pressure and dust rather than a painted circle.
This is a strong choice if you will wear goggles on and off during an event. Test the goggles before finishing the makeup, because straps and frames can rub away product around the nose and brow.
Soot-covered mechanic
A mechanic should look as if he has been near engines, grease, and metal dust. Use black sparingly and build grime with brown, charcoal, and gray around the nostrils, jawline, temples, hairline, and hands if they will be visible.
- Best texture: dab with a sponge instead of drawing smooth patches.
- Best finish: matte soot with only a small amount of bronze.
- Common error: covering the whole face in flat black, which looks more like face paint than engine grime.
Wasteland explorer
A wasteland explorer is dustier and less polished than a Victorian look. Muted browns, taupe, dull bronze, and charcoal work better than shiny metallics, especially if the costume has scarves, straps, worn leather, or utility pieces.
Stronger contour can make the face look leaner and more tired, but keep it uneven. This is a forgiving option for beginners because imperfect blending often supports the survival-style character.
Mechanical face design
A mechanical face design should usually stay on one side of the face. One temple gear, one eye panel, or one line of rivets is easier to read than several competing details.

How to create an easy steampunk makeup look
Build the look in this order: clean skin, light base, soot, brows or beard, bronze, simple mechanics, then setting. That order matters because mechanical details look better when the face already has structure and wear.
You do not need a large kit. Matte brown and black eyeshadow, concealer or skin tint, brow powder, a bronze or copper shade, a small brush, translucent powder, and setting spray are enough for most beginner looks.
Clean and prep the skin
Wash the face first, then use a light moisturizer if the skin feels dry. Let skincare absorb before applying makeup; otherwise soot and bronze can slide around or catch in patches.
If you have a beard or mustache, brush it into shape before starting. It is much easier to darken or sharpen facial hair once you know where the natural lines sit.
Apply a light natural base
Use only enough concealer, skin tint, or foundation to even redness and under-eye darkness. Let beard shadow, texture, and natural skin show through, because a perfectly smooth base can make men's steampunk makeup look too polished for a rugged character.
Add soot around the face
Place soot where dirt would actually collect: hairline, temples, sides of the nose, under the cheekbones, jaw, and a little on the neck if the costume exposes it. Blend brown and charcoal first, then add black only where you need more depth.
For daylight parties, keep the soot softer so it does not look harsh in natural light. For stage, photos, or dim indoor events, you can deepen one side of the face for stronger contrast.
Strengthen the brows and beard
Brows give the face instant character. Fill sparse areas with brow powder, pencil, or matte shadow close to your hair color, but avoid a sharp cosmetic brow unless the character is meant to look theatrical.
Blend in bronze highlights
Bronze, copper, or antique gold keeps the look from becoming plain dirt makeup. Add a small amount to the cheekbones, temples, brow bone, or bridge of the nose, then blend until it looks worn into the skin.
- Use muted bronze for a realistic costume.
- Avoid chunky glitter unless the whole look is intentionally theatrical.
- Keep it light if the costume already has many metallic accessories.
Paint simple gears or rivets
Small details are more convincing than large messy ones. Paint a short row of rivets along the jaw, a tiny gear near the temple, or a few panel lines near one eye using brown or black first, then bronze or gunmetal over the top.
Set the finished makeup
Set oily areas such as the nose, forehead, and under the eyes with translucent powder, then use setting spray if you have it. Check the makeup with your costume accessories on, because goggles, hats, scarves, and collars can rub away product faster than you expect.
How to add mechanical face details
Mechanical details work best when they have a clear focal point. Put them on the temple, outer eye area, upper cheek, or jawline, and leave enough plain skin around them so the design does not look crowded.
Paint small gears near the temple
The temple is a beginner-friendly spot because it is fairly flat and easy to blend into the hairline. Draw one or two small circles, add simple teeth if you can, then shade one side with charcoal and highlight the other with pale gold or white.
Draw rivets along the jaw
Rivets along the jaw can make the face look stronger while adding a mechanical edge. Place small dots along the natural jawline or beside the beard line, then add a tiny shadow under each dot so they look raised.
Do not make every rivet perfectly spaced. Slight variation looks more natural and less like a sticker pattern.
Add metal panels around one eye
A metal panel around one eye is dramatic, so keep the rest of the face simpler. Draw angular lines around the outer eye socket or brow area, fill with bronze, gunmetal, or muted silver, and keep all product away from the waterline.
- Dark edge: makes the panel look recessed.
- Light edge: makes the metal catch light.
- Soft gray around it: helps the panel look fitted into the face.
Create a goggle shadow
A goggle shadow is one of the most useful steampunk effects because it tells a story without glued pieces. Press or blend brown and charcoal around the eye area where goggles would sit, making the bridge of the nose and outer edges slightly darker.
Attach lightweight gears away from the eyes
Only use lightweight, smooth pieces made from plastic, resin, or foam, and attach them with a cosmetic adhesive made for skin. The safest-looking placements are usually the temple, upper cheek, or forehead; avoid eyelids, under-eyes, and any spot that moves heavily when you smile.
Test the adhesive before the event if your skin is sensitive. If a gear feels heavy, sharp, or uncomfortable during the test, skip it and paint the detail instead.
How to remove steampunk makeup safely
Removal should be done in stages: attached pieces first, adhesive second, makeup third, cleanser last. Dark pigments and glue are easier to remove when you slow down, and your skin will usually look calmer the next day.
Remove attached pieces first
Take off gears, studs, foam pieces, or prosthetic details before removing the rest of the makeup. Hold the skin steady with one hand and loosen the edge gently with the other; if it resists, stop and use remover instead of pulling.
Loosen adhesive with the right remover
Match the remover to the adhesive you used. Spirit gum needs spirit gum remover, prosthetic adhesive usually needs its matching solvent, and some small lash-glue details may loosen with an eye-safe oil remover.
Avoid household solvents or random craft removers on facial skin. They are not worth the risk, especially near the eyes.
Wipe away face paint gently
Use cleansing balm, cleansing oil, cream remover, or micellar water to break down soot, bronze pigment, and long-wear products. Press the remover onto stubborn areas for a few seconds before wiping instead of rubbing harder.
The hairline, nostrils, temples, and beard area often hold pigment the longest. Give those spots an extra pass with a soft cloth or cotton pad.
Clean the skin twice if needed
If the face still feels slick, gritty, or stained, cleanse a second time with a gentle water-based cleanser. This is especially useful after heavy black shadow, metallic cream products, or adhesive residue.
Finish with a simple moisturizer
Apply a plain moisturizer after cleansing, preferably something gentle and fragrance-free if the skin feels tight or red. Skip strong exfoliants or active treatments right away unless your skin handles them well, because the goal is to calm the face after costume wear.

Conclusion
The best steampunk makeup for men is not the heaviest version; it is the one that matches the character and stays comfortable long enough to wear. Start with soot, structure, and muted metal tones, then add one mechanical accent only if it makes the face more readable rather than busier.
FAQ
What colors work best for men's steampunk makeup?
Matte brown, charcoal, black, taupe, bronze, copper, antique gold, and gunmetal work best. Use dark shades for grime and structure, then use metallic shades sparingly so the look stays rugged rather than glittery.
How do you make fake soot for a steampunk look?
Blend matte brown and charcoal eyeshadow, then add a little black only in the deepest areas. Dab it on with a sponge or fingertip so the texture looks broken and smoky, not like a solid painted patch.
Can you create steampunk makeup without face paint?
Yes. Regular concealer, eyeshadow, brow powder, bronzer, and metallic shadow can create soot, contour, goggle marks, and small rivets without using theatrical face paint.
What colors work best for men's steampunk makeup?
Matte brown, charcoal, black, taupe, bronze, copper, antique gold, and gunmetal work best. Use dark shades for grime and structure, then use metallic shades sparingly so the look stays rugged rather than glittery.
How do you make fake soot for a steampunk look?
Blend matte brown and charcoal eyeshadow, then add a little black only in the deepest areas. Dab it on with a sponge or fingertip so the texture looks broken and smoky, not like a solid painted patch.
Can you create steampunk makeup without face paint?
Yes. Regular concealer, eyeshadow, brow powder, bronzer, and metallic shadow can create soot, contour, goggle marks, and small rivets without using theatrical face paint.